Content creators, and folks who spend a lot of time on video calls know the importance of good audio. Poor quality sound can really impact your final product… so getting a dedicated microphone can really up your game. But dedicated microphones tend to have one significant problem; they are often anything but portable. Meaning if you are a hybrid worker at home and in the office, or you work while traveling, bringing along a microphone might not be possible. That’s where portable microphones come in. A YouTube viewer recently brought my attention to the Tula Mic. With its retro style and premium looks it’s definitely eye candy, but can it perform well as a pricier, bigger-brand microphone? I can tell you right off the bat I had a podcast emergency where the Tula saved the day, but I also discovered it has some hidden features you would definitely not expect.
In my hands-on review I’ll dive deep into some of the more interesting features that help the Tula Mic stand out from other mics that are geared at content creators.
Tula foldable USB microphone
Summary
The Tula mic is a versatile piece of equipment, easy to use, and has great sound quality. A must-have for content creators on the move.
Pros
- Small and portable
- Can use on built-in stand or mic arm
- Usable as a wireless voice recorder
- Great sound quality
- Usable with many device types
- Buttons are easy to read and use
- Looks good in video podcasts
Cons
- Indicator lights could be better
- I couldn’t get 2-person interview mode to work
What’s the in the Box?
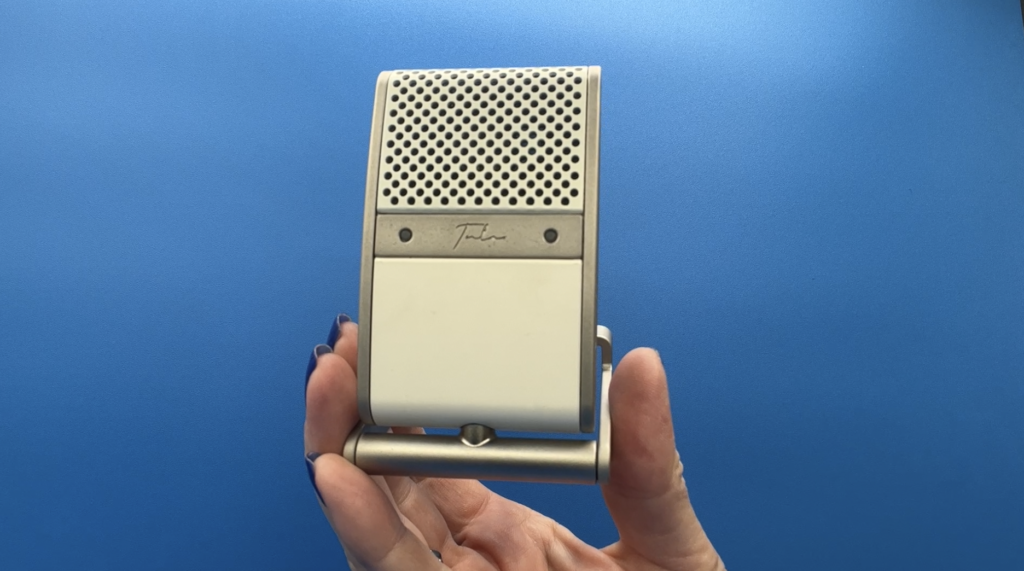
Inside the box is the Tula Mic itself which is a USB-C connected mic for smartphones and computers.
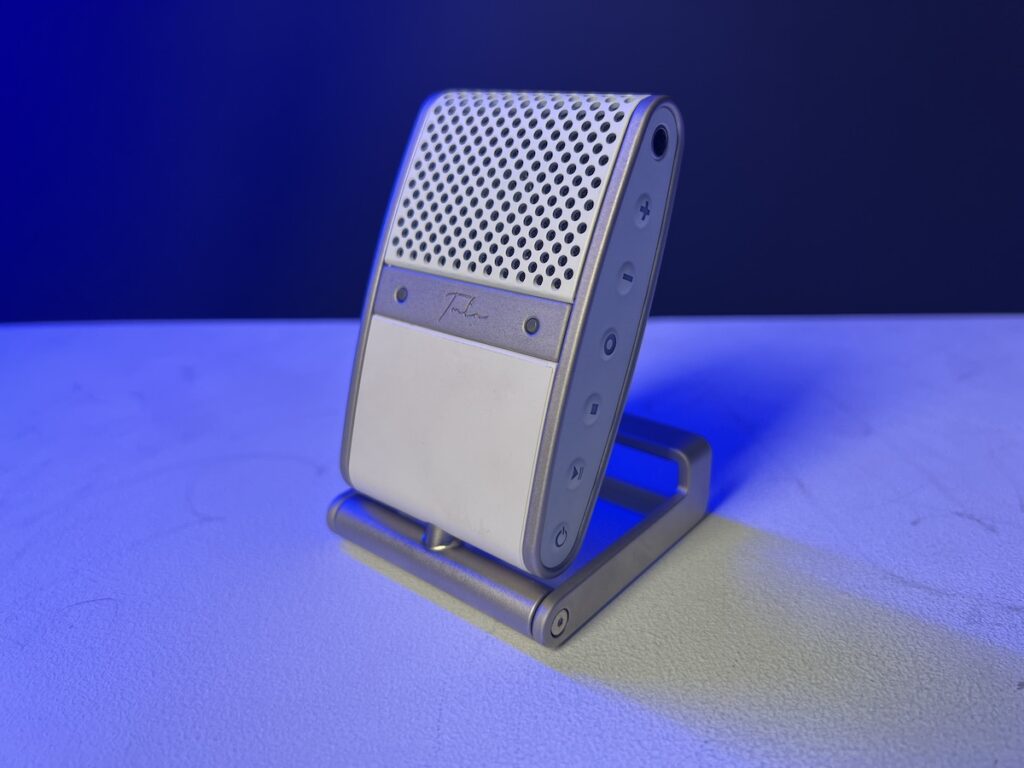
One of the first things you’ll notice is its flip stand. Flip the stand around and set it on any surface. A simple twist removes the stand so you can clip in the included Tula Mic stand adapter which lets you mount the Tula mic to an ordinary microphone stand. Be sure not to lose this tiny part, as replacements cost $15 USD.
Also included is a USB-A to USB-C data cable for charging the mic or hooking it up to a computer or phone to turn the Tula mic into an external mic. Tula offers the mic in Black, Cream, Red, and Seaform (Cyan) colors.
You can also upgrade as I did and get a USB-C to USB-C cable, the so-called ‘Dead Cat’ cover for reducing wind noise, a pop filter, or a nylon hardcase for travel—all at nominal extra cost.
Watch my Video Review of Tula Mic
Set up
There’s really no set up required for this microphone and it’s essentially plug and play. I was able to connect it using the USB-C to USB-C cable directly to my MacBook and the MacBook recognized it right away. Tula does request you to upgrade the firmware by connecting the mic and going to its website, then drag-dropping a firmware file onto the mic (which appears as a storage drive in the MacBook), which I did.
Tula Mic Features
For a microphone that lacks any kind of display, I was surprised just how feature packed the microphone is. I’ll go ahead and say it isn’t perfect either because it is also missing some features so the value proposition really depends on how much you care about each individual feature and lack thereof. Let’s go over these bit by bit.
Dedicated USB Microphone
You can use the Tula Mike with almost any device that will support an external microphone including laptops computers and even smartphones. As soon as you plug the Tula mic into your supported device using the included cable, the device will treat it as an external microphone and you don’t have to worry about installing any fancy drivers.
I used the microphone with my Apple MacBook Pro, while travelling to manage voiceover work I had to do from the road. It was incredibly easy to connect, and my MacBook recognized it right away, and gave me no trouble with it.

Once connected, the Tula mic should work with your favorite audio recording apps and DAWs. You can even use the zero latency live monitoring features as your computer should recognize the Tula mic as both an input and output audio device. Because the mic uses a USB-C cable, you can also use it with just about any Android device or any iPad with a USB-C port.
Connecting to iOS and Android devices
Some of you out there maybe wondering, Can I use the Tula with my iPhone, iPad or Android phone or tablet?
The answer is a resounding yes.
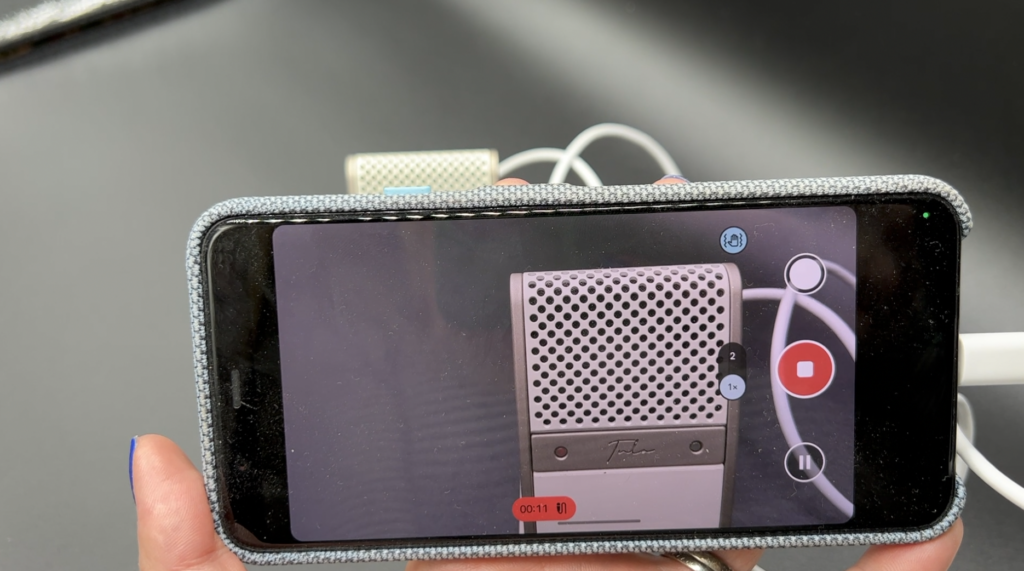
Using Tula with Pixel smartphone.
With an iOS device, you do need to use an Apple-approved adapter with an MFI chip such as Apple’s Camera Adapter. iOS devices with a USB-C ports like the iPad Pro don’t require a camera connector.
I don’t have that adapter, but should probably get one, so I was not able to test the microphone out with my iPhone.
With an Android device, use any cable or adapter that will connect to a USB-C.
The Tula will automatically be chosen as your default audio input AND output so monitoring will have to be done via the 3.5mm headphone jack.
I was able to connect the Tula microphone to my Google Pixel phone and found it worked easily and provided much better quality audio. Then I was getting from the phone’s internal microphone.
Sound quality
I have to say I was incredibly impressed by the sound quality from this microphone. Because of its literal pocket size, I wasn’t actually holding out much hope that this would be a good quality microphone. I wanted it mainly to bring along on my business travels, so I always have the ability to record voiceovers and other audio. I have to say I was rather blown away by the quality.
 When doing single-person voice overs the mic was easy to use and provided audio that was as good as some other more pro-sumer microphones I own. I also used it to record some audio while working in a studio with a crew just to see how it would sound, and it seem to record multiple users extremely well. I also tried it out with a two person configuration by plugging in a second wired microphone, and I can say that was an awesome hack, and would be ideal for Podcasters on the go.
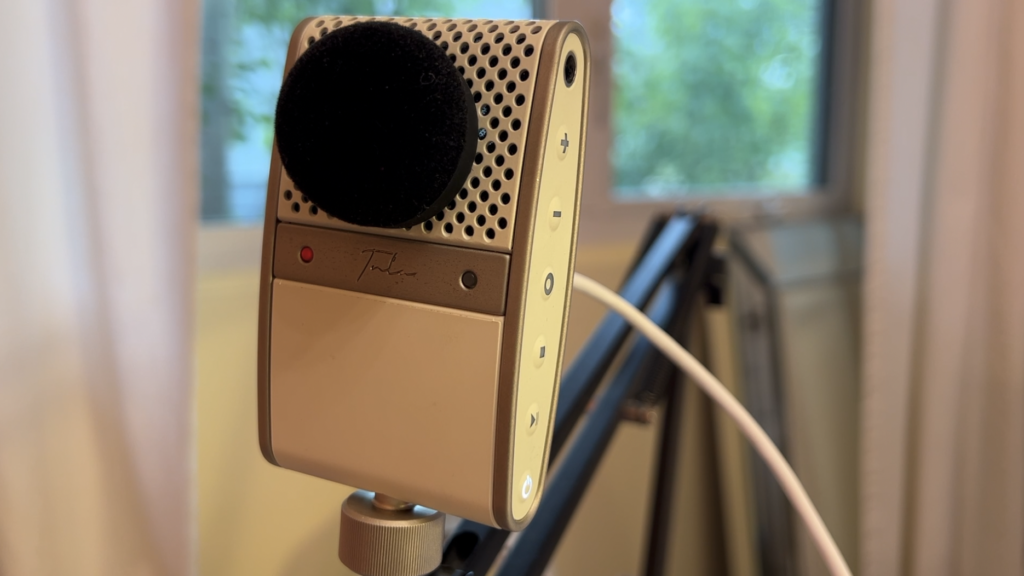
The Tula Mic also came to my rescue when I was making a podcast appearance on one of my favourite shows, Home Gadget Geeks. For some reason my trusty Rode microphone was not sounding great. After fiddling with it for far too long, I realized the Tula mic was sitting right next to me so I swapped it in. Professional podcast coach and host Jim Collison (who I consider an expert in audio quality) was blown away by the improvement in sound quality. Small thing, but the Tula Mic was also far nicer looking and less obtrusive in the video podcast recording.
I haven’t swapped the Rode back in yet…and may not bother.
Adjusting audio levels (gain)
The feature, I probably liked the least about the Tula Mic is that it can be difficult to judge your audio levels. Because there is simply the one light with green, orange, and red display, you have to use your best guess to make sure you’re not too loud or too quiet. The user manual for the device goes into a bit more detail about how to judge this appropriately, but it might be nice to have even a small actual gain meet her somewhere on the microphone for insurance.
Wireless recorder
Without any accessories whatsoever, the Tula mic can function as a personal recorder. With 8 GB of storage space and a 700 mAh internal battery capable of lasting about 12 hours (10 hours with lossless recording), the Tula mic can be a truly independent mic-slash-recording device for getting high-quality sound.
Having no screen gives the Tula mic a rather classic look and makes usability feel more straightforward. No need to swipe through menus or work with some fancy touch UI since side of the device features an array of icon-marked buttons.
Managing recorded files
Your computer will also treat the Tula mic as a storage device because of its built-in flash memory. This is something you should keep in mind as it serves as your only means of transferring the recorded clips out of the mic, or deleting them. Just plug it into your computer using the USB cable and pull up the menu to manage your files.
Buttons for quick control
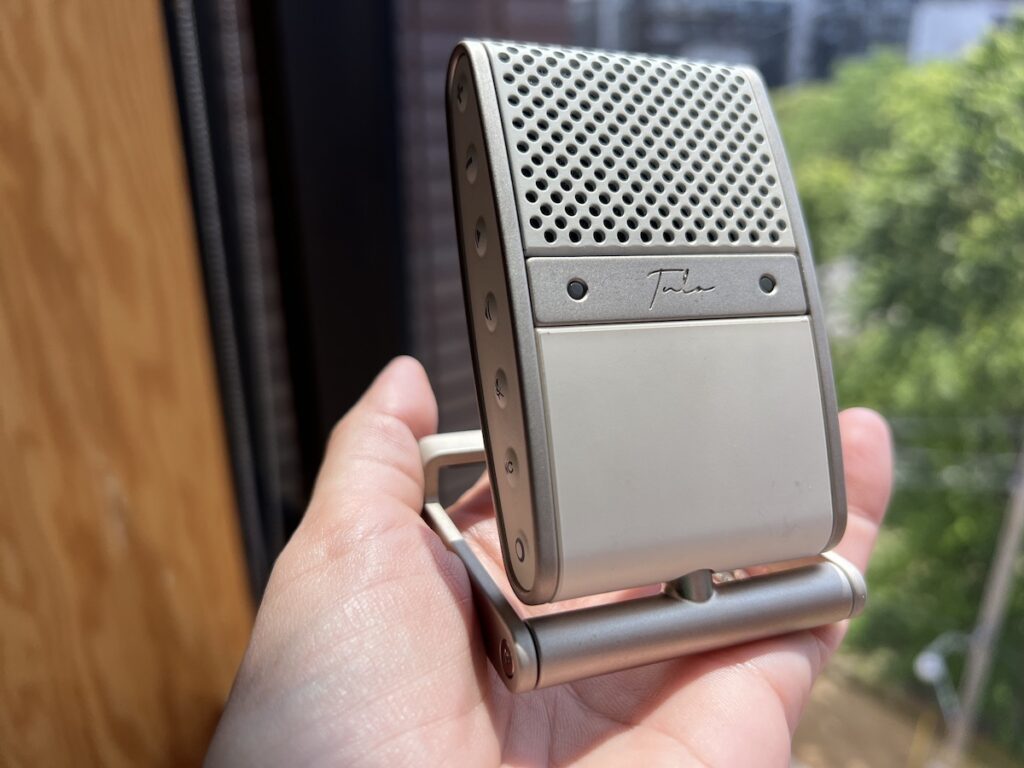
The buttons on the right include an on/off, play/pause, stop, record, and volume controls while the opposite end offers gain, skip, and mute controls along with dedicated toggles for the noise reduction and mic mode respectively.
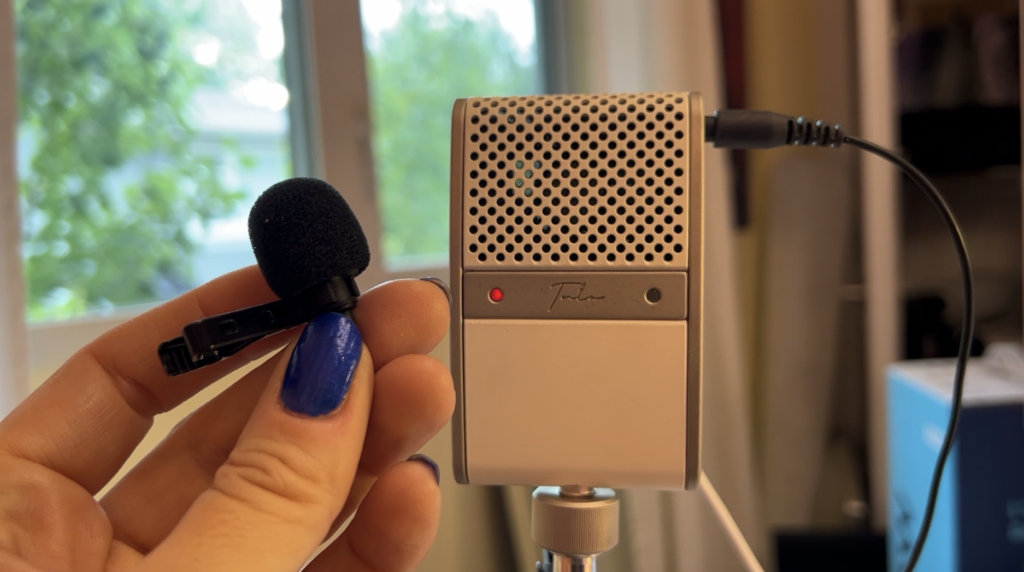
On the front of the Mic are two lights: On the left is the recording indicator button, (if it’s red it’s recording) showing you it’s on and working, while the right side gives simple at-a-glance gain info. (This is one of those minor faults; you can’t accurately assess your gain level on the microphone, you need to monitor it on your computer or using your audio recording software.)
Battery
A tiny low battery indicator is on the back and only comes on for 5 seconds after you hit the power (another of those small imperfections). Green is full, yellow means you’re getting low and red means charge now. Tula says you should get about 10-12 hours of continuous recording per charge.
Brusfri Noise Reduction
The Tula Mic has Klevgrand’s Brusfri noise reduction technology built right in. Klevgrand is the same company that makes a Brusfri plug-in for digital audio workstation (DAW) software and it does a terrific job in eliminating unwanted background noise. On top of that, using the feature only shaves away 2 hours of the total battery life, leaving plenty of juice for long recording sessions.
This technology is helpful, but not made to erase a poor quality recording environment; it’s not going to magically eliminate barking, dogs, or screaming kids, it’s there to enhance the overall sound.
It’s easy enough to activate also; just push the NC button on the side while the background noise is present and don’t speak or introduce other sound. The internal software it will learn what the sound is that you don’t want to be there and adapt accordingly. To turn this off, you can just press the NC button again. The LED light being off means no noise cancellation is happening. Worth noting is that the Tula Mic will always save a version of your file both with and without noise cancellation so you have the option to experiment.
3.5mm/aux Jack
With the headphone jack gone from virtually all modern smartphones, tablets, and even some laptops, seeing the 3.5mm jack on the Tula mic is a bit of a surprise. The jack does far more than just allowing you to connect wired headphones for listening to your stored recordings. With live monitoring, you can use any pair of wired headphones or wireless headphones with a 3.5mm jack to listen to your voice in real-time as you record on the mic, with no latency.
Rather surprisingly, you can use that Aux port to double your inputs too: plug a lavalier or other microphone into the 3.5mm jack to serve as a second microphone which can be useful for conducting interviews. You can activate the connected microphone anytime you wish by long pressing the “Mic Select” button on the Tula mic.
- When the LED is off, the Tula is in its default UNI mode. This is the best choice when recording sources in front of the Tula. (podcasts, Zoom calls etc)
- A short press will switch the Tula to OMNI mode and illuminate the LED. This is often best for when you want to record an entire room or 360 degree outdoor environment.
- A long press will activate the LAV mic input (via the 3.5mm jack) and cause the LED to
UNI + OMNI Modes
The Tula mic offers both UNI and OMNI modes so you can pick the mode that suits the current environment. The UNI mode serves as the mic’s main feature where the mic only picks up sound coming from the front of the mic. Using the OMNI mode is useful if you prefer picking up sound from all directions.
Recording two-person audio or larger groups
 If you want to use the Tula with a lav microphone, plug it in and then long press the Mic Select button for about three seconds so the LED light is flashing. You can adjust the gain using the plus and minus buttons on the upper left side of the Tula so that the game meter is flashing mostly green and not red.
For recording a group, use the Mic Select button to enable omnidirectional recording on both sides of the mic.
Trouble with two
I tried using the Tula with a Lav, and the first thing to note is it doesn’t seem to work in live mode; you must record it to the storage on the mic. The trouble with that was wasn’t able to access the files when I was recording two users. I fought with it for an afternoon and tried a few different options, but gave up after a few hours. I’ll have to do some more reading on this, and if you have experience here, please put it in comments. The simple fix for now will be just to use Omni mode for multiple speakers.
In case you’re wondering, here are the steps for recording in Interview Mode:
- Turn on the Tula by short pressing the ON/OFF button (bottom right)
- Plug the lavaliere mic (TRRS only) into the 3.5mm jack (top right)
- Attach the lavaliere mic to your subject.
- LONG press the RECORD button (center right) (front LEDs will flash green twice)
- The front LEDs both function as gain meters in Interview Mode. The left one indicates the level of the Tula’s main mic and the right on indicates the level of the lav mic.
- You may adjust the level of the main mic using the + and – keys on the LEFT side of the Tula and the level of the lavaliere mic using the + and – keys on the RIGHT side of the Tula.
Missing Features
As impressive as the Tula mic’s feature set is, there are a few small omissions that are worth noting here. I am not deducting any points for these omissions, simply pointing them out for those for whom these might be dealbreakers.
No wireless or Bluetooth connection
This might be obvious by now but the Tula mic shouldn’t be considered a wireless mic. Without any built-in Bluetooth or other wireless functionality, you really need the data cable to get your audio to a computer or mobile device. Having no Bluetooth support also means that you cannot use your favorite wireless earbuds as live monitors for the Tula mic.
The lack of a screen may have its advantages but those who might be used to seeing a VU meter will have to get used to the different light indicators on the device. The Tula mic also lacks a built-in speaker, making it impossible to play back audio recordings without connecting a pair of wired headphones (which almost no one has any more).
While 8 GB of built-in storage space is a rather unique feature, but you cannot check how much storage the device has left without plugging it into a computer. The mic is also limited to recording WAV files which are great quality but are also very large in file size. I would have appreciated it if Tula offered the choice to the user to decide if they want pristine audio quality or something down the middle such as a high-quality MP3 or even FLAC support which is also lossless but doesn’t take up as much space.
Overall review: Tula Mic
Overall the Tula mic is beautifully designed; it’s small and portable, it’s versatile, since you can use it on its built in stand or on a mic arm. It also doubles as a wireless voice recorder. The sound quality was surprisingly great for the size of this device and the fact I can use it with smart phones, tablets, and on my MacBook, makes it an amazing audio chameleon.
The buttons and lights are user-friendly and easy to read, and it’s easy enough to make adjustments on the fly. The array of clever accessories you can also get for this mic also make it a must have for content creators on the move.
So what are the downsides? I can say some of the indicator lights could be a little more robust, but it’s hard to wish for too much more while wanting to keep the package small. I guess the other downside is that it will not function as a wireless microphone; you do need to keep it plugged in to a computer if you are transferring audio in real time. (Though you could record then transfer audio after the fact).
While more hard-core pro users might find this microphone lacking, I think it’s an outstanding package for your average content creator, podcaster, or expert Zoom presenter.
Selling for $259 USD/349CAD the Tula Mic is like a Swiss army knife for creators. Yes it’s expensive, but I think it’s absolutely genius, extremely versatile, and I love using it both at home and on the road.
You can get the Tula Mic from Tula’s website or from Amazon.
**A note about Affiliate Links: TechGadgetsCanada & TechGadgetsInternational is supported by our readers. Occasionally I will include affiliate links in my reviews. I do this partly for convenience of the reader (since I’ll almost always include a link to the company website or similar anyway) in case you want to read more or purchase, but I also may get a small commission from the click, which helps me keep the blog running. If you choose to use this link I thank you greatly for supporting the blog. There’s no obligation or cost to you for using these links. As an Amazon Associate I earn from qualifying purchases.